ANNA'S ANALYSIS
VAN BUILD
ABOUT
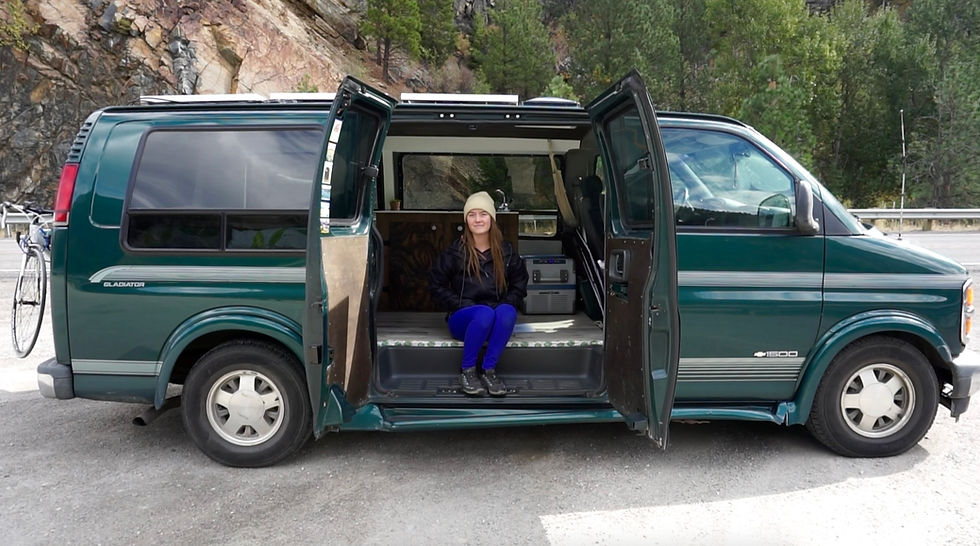
On May 14th, 2018, I bought a 1997 Chevy Gladiator for $5,000 with the goal to convert it (mostly by myself) to a nice, livable space by August for under $5,000 (no, my parents did not pay for any of it, I had a job). I ended up spending $4,765.21 on the conversion + all the items I would need to set out!
I had known about van life for about 1-2 years before doing this and when I first learned about it, it seemed like a terrible way to live. The first people I saw doing it just basically had a mattress in a van and like a cooler for food. But after a while I discovered people who's vans were actually really decked out and looked like nice places to live and travel in- they had insulation, walls, floors, beds that weren't directly on the floor, fridges, stoves, and all that other stuff. It was then that I really started to become interested in doing it myself.
Since I was probably 16 at the time, I had to wait a while before actually being able to buy and convert a van so I spent months doing as much research as possible and watching hundreds of videos on van conversions and van life in general.
My goal was to start looking for a cargo or passenger van in April and hopefully find one within the month and then have about 3 months to convert it and leave in July or early August. I didn't end up actually finding a van though until mid-May because of reasons explained here and I also wouldn't be able to leave until August because of reasons explained here.
So for about 3 months, I worked on converting the van and then set out on August 15th 2018!
Some of the reasons I wanted to do van life:
-
I'm out of high school and don't know what I want to do with my life and don't want to waste money and time and stress in college trying to figure it out.
-
It's a good way to save money because I don't have to pay rent or for accommodation.
-
I do not enjoy the area that I live in and have never felt any sort of connection to it nor have I ever felt like I would live there as an adult. I don't like cold winters, there's not many like minded people in my area, there's not a whole lot to do, all that kind of stuff.
-
I think it's a great way to go out of my comfort zone and learn a lot about myself, life, people, different places in the US.
-
Like most everyone, I love traveling. And nature. I think going on road trips is kind of in my blood because my grandparents and parents have driven all over the US and Canada.
Not a reason I wanted to do van life:
-
Because I was super naive and thought that it was gonna be fun fun fun 100% of the time and life was just gonna be me sitting in my bed on the beach with my back doors open watching the sunset every night like #vanlife pictures on IG.
I promise I was well aware of how difficult and uncomfortable and unfamiliar a lot of the experiences would be. While I was excited, I was probably a lot less excited that you might think honestly. There's a lot of things that I knew weren’t gonna be super fun but I wanted to learn how to accept the less desirable aspects of living in a van and knew they’d give me a much greater appreciation for many of the things I've previously taken for granted in life.
And that’s exactly what happened. I spent a little over 3 months in the van, making it back home on Black Friday (about 2 weeks before I originally planned on coming home) after driving almost 2,500 miles in that week! There were many times when I was stressed and anxious and scared and exhausted but I am so glad that I was able to have all those experiences. I learned and grew as a person more than I could have imagined and gained some clarity on what I want to do in life (not whole lot but a bit haha). I also did about 10 days of work exchange in November on a farm in California and am so grateful for that experience as well. Overall I’m very glad I did this and experienced all the good and bad aspects of it that I did!


INTRO
Building a van for #vanlife is definitely not easy but I am here to prove to you that it is possible not matter how little knowledge you have about electrical and construction stuff. I converted my van when I was 17-18 years old and had very little prior understanding of how to do so much as work a drill. But I spent hundreds of hours researching, looking at other van builds, and educating myself on what I thought I'd need to know for the build- and it definitely payed off. I might not be an expert on any of the stuff I'm gonna talk about but I think just walking through what I did for my build can hopefully cover things that a lot of the more experienced people don't talk about. This is not necessarily how you should build your van, it's just how I did it, and I made a few mistakes here and there and some I probably won't realize were mistakes until much later but that's all part of the journey!
First, a few notes:
-I have a video where I go into much more detail about my experience trying to find a van and showing what it looked like before I did anything to it, one showing how I got it from where it started to ready to start the build and showing some of the things I bought for the van up to that point (solar panels, fridge, etc), and then one of the entire van build which might help if you aren't able to understand what I mean by something I talk about below- seeing it can definitely help!
-
My story of trying to find a van and a quick tour before I started the conversion
-
Tearing everything out of it and showing some of the items I got for the van
-All the supplies I list without a price are things that I already had, didn't have to pay for, and therefore didn't include in the cost of the van.
-All $ is USD.
-" is an abbreviation of inches and ' is an abbreviation for feet.
-Some prices listed are without tax, some aren't- it just depends on if I bought them alone or if I bought them at the same time as multiple other things in which case I didn't calculate the tax on each individual item but my final cost for the whole van includes all tax. Prices listed are what I payed, so the links to the products might not always be the same price.
-For the total cost of each part, I don't include the cost of products that were already used for other parts of the build. For example, I used butyl tape for the fan and list the price there but then use it in multiple other parts of the build but don't list the price again because I only paid for it once.
-If you're doing a van build yourself, it's super important whenever you're, say, watching videos about how to do something to scroll through the comments to make sure its not full of a bunch of people saying they did it wrong- because getting the wrong information could mean spending more time and money than you want on something just because you didn't check to make sure the information you were following was accurate.
-To some, this might seem like I'm explaining way too many obvious things... but just because it's obvious to you doesn't mean it is for everyone. I wanted to make this for people who don't understand the difference between AC and DC or have never heard of a MC4 Y connector, okay- because most people just talk about those things like everyone is an electrical technician and it was very confusing to me and I doubt I'm the only one.
-If I give any bad advice, please let me know so I change it. But also just because you would do something a different way does not make it bad advice so just make me aware of the things that other people should not follow.
-Email or DM me on Instagram if you have any questions, I would love to help as much as I can if you're just curious about something or you're doing/planning on doing a van conversion yourself and have some questions!
BUYING A VAN
So before I actually get to the van build, I wanna talk give some tips for finding and purchasing a van. Here are some things you're gonna have to think about before/while looking for a van.
-
What is your budget?
This is probably the most important thing. Everyone has a different amount of money they can spend on their van so looking at how much someone else spent is probably not going to help that much because most people don't disclose how much money they make or spend on the road. Luckily I don't mind doing that so hopefully this can help:
My budget going into the build was $8-10,000. I originally wanted to spend under 4k on the actual van and then 4k on the build, but I honestly wasn't basing those numbers on too much research. After few weeks on struggling to find a van under 4k, I upped it to 6k, and the one I found was $5,000. Keep in mind that you'll be spending a few hundred on all that stuff you do at the DMV. At that time I also figured I would raise the van build to 5k as well making my new budget 10k. Based on adding up the money I had at the time to money I estimated I would make by the time I left, I figured a good estimation of it altogether would be 17-19k, and then minus 10k for the van would leave me with $7-9,000 to last me the few months I was gonna be on the road (about 5).
It's impossible to know how much you'll spend per month on the road but unless you're dining out at fancy restaurants all the time, it seems like a lot of van lifers live on $500-1500 per month and there's a good chance you'll fall in that range. You can look at how much you plan to travel and spend on gas- are you staying in one city or doing a road trip? Are you going to be staying overnight in Walmarts or free campsites or ones that are $15/night? If you've never lived on your own like me and your parents buy most of your food, it might be hard to know much you'll spend on that, but if you're not eating out a lot and know which foods are inexpensive, you can eat pretty cheap. But if you're getting Starbucks coffee 6 days a week- maybe it's time to kick that habit if you've got a budget. $200-400 is probably a pretty doable range. Then you have monthly bills like insurance or your phone bill. Membership to the gym if you shower there. Money for doing activities and going places that aren't free. And then it's always a good idea to have a little bit set aside in an emergency fund in case your van needs maintenance.
Also, are you going to have a job while living in it or are you only using money you saved up ahead of time? How long will you be in the van? What kinds of things will you be putting in the van- solar panels, fridge, etc? Those are all things to take into consideration. You want to make sure that you have enough money leftover to sustain living in the van after you've spent money on the van + build. And you of course do not want get to a place where you only have $300 in your back account so make sure you have more money left over than you think you'll need. And always have a backup plan!
Click here for an in depth video on how I afford to do van life, my first month expenses, and how I make money on the road.
-
What kind of van can you get for your budget?
If your budget is a lot less than mine, that maybe it's best to get a minivan (or a car works too) where you won't have to do much converting, really just put a mattress, cooler, and some cute string lights in there. This will be the least comfortable to live in but also the least expensive. If it's a little less than mine, maybe you can find a reliable cargo van (or something alike) for a thousand or two less than what I got but make sure you know there isn't any big problems with it. If you can't, you can just do a simpler build, use a cooler instead of a fridge, no solar panels, no fancy cupboards or cabinets, just use those simple plastic bins you can get from anywhere for storage and a piece of fabric w/ velcro or on fishing line to hide it and make it look a little neater, a big bowl or tray-like thing with no drain as a sink, USB/battery powered fan instead of vent in roof. There's tons of things you can do that might make things slightly less comfortable but a little less expensive. Here’s a really good video that shows how to convert a van in one day so it’ll give you a lot of ideas if you want a really simple build. If you have a little more to spend or in some cases about the same amount, maybe a high top cargo/passenger van or a pop top van is the best option. Those are harder to find though, at least where I live. If you have $30-40k to spend, maybe a Sprinter or Ford Transit (the high top ones) is the way to go. If you don't have the time or don't want to convert a van yourself, you could always try to find a conversion van that you'd have to only do a few things to or nothing at all. You could also go with a school bus or short bus which usually aren't too expensive but there are a lot of other things to take into account when buying a vehicle to live in...
-
What kind of fuel does it take and mileage?
The only 2 common vehicles I know of that don't take gas and instead use diesel for fuel are school buses and sprinter vans. Those are some of the things to take into account, as well as the fact that school buses for example, may be cheap for how much space there is inside, but they are not going to get good mileage. So do some research beforehand on what vehicles have good and not so good gas mileage. Not that really any van is gonna have that good of mileage haha. And know if you're gonna be adding a lot of weight to it which will make the mileage go down.
-
Are repairs easy?
If you're planning on getting a 1983 VW Bus because it's always been a dream of yours, you better hope stuff doesn't go wrong because repairs aren't gonna be as easy or cheap as, say, a 2010 Chevy Express. I've heard the same with sprinter vans because parts are spendy and apparently not many mechanics are trained to work on them?? I might have that slightly worded wrong (hence the question marks) but bottom line: there are certain vehicles are not as easy or cheap to repair as others. Also the older the vehicle + the more miles, the more likely repairs will be. I had to get my power steering pump replaced within the first month after doing a U-turn in Yellowstone and the wheel getting super hard to turn. It ended up being about $650. Also it’s a good idea to get AAA (if you live in the US). I pay $46/a year for me and my mom to have it and they can reimburse for a good church of what you may pay if you get your vehicle towed or serviced.
-
Are you gonna be comfortable driving it?
If you're only used to driving a car, driving a big van is going to be very different. Of course you can always learn how to drive it and become more comfortable but I wouldn't recommend to a 19 year old to buy a full length school bus if they've only ever driven a Prius. Even after driving my step-dad's truck for a few months, the van took a bit to get use to. I always felt like I was gonna tip over when turning corners at 5 mph and turning into tight areas is something I'll probably always be scared to do even though it's not the longest vehicle I've driven.
-
Do you need to be able to stand up?
For some people this is a must but if you're on a tight budget, don't get your hopes up for finding something cheap with a high top. To me, it's just motivation to spend more time outside! Also the higher the top is, the more space you will have inside to add storage, which might be extra important if you will be with a friend, partner, child, or dog!
-
How stealthy do you want the van to be?
Cars, minivans, and cargo vans are the stealthiest.. followed closely by vans like the one I have that look a little more camp-y, and ones with pop tops are nice if you want a high top but only at certain times need it up. Sprinters, Transits and cargo high tops are slightly less stealthy I suppose but still look like work vehicles. VW buses (and things alike), school buses, rv's, and campers are of course gonna be the least stealthy but maybe stealth isn't something you need if you're gonna be camping mostly or staying in Walmart parking lots where there’s tons of other people overnight, cameras, and lights. 'Stealth' is important for urban camping/staying in neighborhoods because you don't want people to see it and think someone is sleeping inside it. But another thing to keep in mind is that if you have a fan in the roof, non-flexible solar panels, surf board or roof box up top, bike rack, all those make it less stealthy so if one or more of those is a must, then finding the stealthiest van isn't gonna be of the utmost importance. I have 3 of those and I can tell you my van is not at all gonna pass as someone not sleeping in it.
-
How many miles is too many for you?
Say you find a van for a 'great' deal but it has 300,000 miles on it- is that still a great deal? In my opinion, no. Once a vehicle has that many miles it's just gonna be repair after repair. I only looked at vans under 200k miles and would have preferred one closer to the 100k range. The one I got ended up having 106k which was perfect. The more miles it has, the more issues it will likely have. But maybe you want to have a reliable vehicle van for many years, then it might be best to look for a lot less.
-
What are some things that the van must have and absolutely cannot have?
If there are anythings that need to be there or can't be there, keep those in mind when you're searching.
-
Who will go with you to look at vans, when are times that you're both able to go, how far are you willing to travel?
When buying a vehicle, you have to obviously have someone go with you unless you're planning on leaving the vehicle you drove there in behind. Finding a time that works for both of you might be hard but to make it harder you have to make sure that mechanic shops + the person your buying the van from or the dealership is also open. And it's even harder if you don't live very close to big cities where there's a wider variety of vehicles. Some people are willing to fly across the country to buy a van and others might not want to or be able to go more than 50 miles so you have to find what works for you. Do you and the person you're going with have an entire day off (thats not a sunday if you're buying it from a private seller and want to have it checked out by a mechanic, because most shops, at least from my experience, are closed sundays) where you can drive maybe 4 hours each way to look at one? If it's from a private seller, are they going to be available in the middle of the day? It can be quite complicated truthfully. Also, if you're female, going with an older male (one who knows a lot about vehicles would be best it's ok if they don't) is the safest and will probably make negotiations easier.
So where's the best place to find a van? Craigslist is probs #1, Ebay might have something here are there, Facebook rummage sale pages (I don't have FB so that's probably not what it's called) can work. Otherwise checking around local dealers will probably only lead to much in a bigger city, make sure the dealership has a good reputation, read online reviews. I found mine on Craigslist and my mom found a good one on FB that fell through but I'd say those are your best options if you're on a budget. Cheaper dealerships often don't have good reputations, and nicer, more trustworthy ones sell newer, nicer, much more expensive vehicles.
Dealers also aren't automatically more trustworthy that private sellers. Make sure you get a good vibe from the person. If they act like there's nothing wrong with the van, there probably is something wrong. If they're willing to point out spots of rust or little things here and there, then they're probably not trying to hide anything. If their response to all your questions is short and unspecific or if they avoid your question by changing the subject ever so slightly and rambling about it for 10 mins, that's not a good sign.
Anyways, I'm getting a little ahead of myself: Once you find a van that fits what you're looking for, it's important to ask the person questions before coming to check it out if it's a ways away. And then once you're there you're gonna want to inspect it as much as possible (especially if you're not able to take it to a mechanic before you buy it). What I did was used this Checklist I'd found online which is a perfect guide for both of those things.
If you decide it's worth checking out, you'll want to call your insurance company to make sure it's covered for the drive home. You'll also want to call mechanics in the area and find one that's available to do an inspection. They usually aren't too expensive, I payed $40 for one I got, so it is definitely worth it.
Then once you buy one, you go to the DMV and get your Title, License Registration, pay the taxes on it and all that. My total ended up coming out to $314.50. If you don't mind being a little sneaky, have the person (or do it yourself) write the amount you paid for the van as a thousand to a couple thousand less than what you actually paid (on the title) so you don't have to pay as much for taxes. It might not be legal but it's pretty common. I'm not saying that I necessarily did that, just that some people do. :)
PREPPING FOR THE BUILD
This is a quick one because for most people, your van probably won't come with much in it, if anything. But if it does, you're gonna be unscrewing a lot of screws and if you can't get something out (there was about large 12 bolts in my van that we could not get out and our mechanic had to cut them with a torch), just take it to a mechanic or someone with power tools that do the job.
In most builds that I've seen, people pretty much only build up to right behind the front seats so anything behind that you want to be down to the bare metal. You might have to take parts of the doors off (if you're planning to insulate) or unscrew plywood floors but other than that I think most peoples vans come pretty empty.
Then the only thing you need to do it clean it up a little bit, get all the interior dirt, dust, and grime off with a wet/dry vac, leaf blower, mop/broom and water, washcloth and water... and if its needed, use some rust paint on any areas that may need to be covered.
You can also take as many measurements as possible before doing anything but I found it to be better to do them as I go because lengths are gonna change as you put insulation, flooring, and all that in there.
You don't necessarily need to have many materials before you begin but if it might be handy to get as many larger items as soon as possible because they take longer to ship (my solar panels took 1 and a 1/2 weeks). If you're gonna be getting a lot of stuff on Amazon, I recommend getting a 30 day free trial for Prime so you can get free 2 day shipping! And then once it's almost up, cancel it, and then they'll offer you another 30 days for free (at least thats how it was for me). Theres nothing worse that wanting to finish the build in a certain amount of time but you only order things right when you need them and then have to wait a week to get them. Buy everything you are certain you need as early as possible.
INSTALLING THE FAN
VIDEO
SUPPLIES I USED:
-
Fan-Tastic Vent Model 1250 - $169.84
-
Water, scrubber + towel
-
Mastix Butyl Tape 3/32" x 3/8" x 45' - $4.74
-
General Electric Silicone Sealant - $6.58
-
Caulk gun
-
Tape measure + 90 degree ruler
-
Safety glasses
-
Sharpie
-
Masking tape
-
Ladder
-
Drill + drill bits
-
Jigsaw
-
Milled tooth file
-
Utility knife
-
Total cost: $176.42
STEPS:
-
The first thing I did was just took a scrubber and some water and quickly cleaned the the area around where the fan would be.
-
Next I measured the dimensions of the fan which ended up being 13 13/16" x 13 13/16". Then I went inside the van and measured halfway between the beams that support the roof and halfway between the sides of the van (it really doesn't have to be exact) and used a sharpie to make a dot. Then put on some safety glasses and use a drill to drill a hole through the roof. My step dad had to help me with it because its a very hard angle to hold a drill steady from so you might need some assistance if you're not super strong or don't have a very good drill.
-
Once I got the hole, I used a ladder to get up top and brought a sharpie, tape measure, 90º ruler, masking tape, and a towel + garden pad to sit on because it was hot. I then used the dimensions of the fan and ruler to make an outline and put masking tape around it to make it easier to follow with the saw.
-
Next I used a drill with a bit (thats the thing that you put on the end of the drill) that will make a hole big enough to fit the saw I used. I drilled one hole in all four corners to make it easier to do the corners. I practiced with the saw in one of the holes going in toward the middle before following the outline and it was not super easy. Once I started with the outline I realized I sucked at making the line straight, so my mom tried and so did she, so my step dad ended up having to do it.
-
Once we got toward the end, I went inside the van to hold the piece of roof that was being cut out up to the height that it was suppose to be so it was easier to cut.
-
After it popped out, we checked to make sure the fan fit and it did! I used a milled tooth file to make the edges of the hole a little less sharp. According to my step dad, you don't want to go up and down with the file, just down, then pick it up and go down again and so on. Another thing to keep in mind is that it is okay to make the hole bigger than it needs to be by a few 16ths of an inch/a few mms, it will not allow water in unless you seal it wrong, in which case water will leak in no matter what.
-
Next I flipped the fan over and applied the butyl/putty tape to the bottom side of the fan where the screw holes are. You can also put the tape right on the roof. Since my tape was not very wide, I used 3 pieces side by side by side on each side of the fan. It is ok that the tape covers the screw holes. Since my roof was not completely flat all the way across (most aren't) there was a dip in two sides of the outline on the van. In those dips, I put 3 pieces of tape down and then another 3 on top (6 total on each side) so that it was even with the rest of the roof.
-
Then I put the fan in the hole making sure that it opens toward the rear end of the van so if I ever forget it's open when driving, the cover won't snap off. Next I took a drill and pre-drilled all the holes to make the screws easier to go in. You want to make sure the holes are smaller than the screws! The butyl tape got all over the drill bit, but I just took it off as I went, its no big deal. And don't worry if some of the holes have to be crooked- because of the way the fan cover is, it's not possible to drill all of them perfectly straight down without the cover raised all the way (which is probably the smart thing to do but its not what I thought to do at the time). The fan I bought came with the 16 needed screws, so I drilled the first one in a middle hole loosely and then went to the screw hole opposite of it and did that one loosely as well, then the other two sides, then the four corners, then the ones between the middle and corners, so the pressure was evenly applied. Then I went in with a screwdriver and tightened them all instead of using the drill because I didn't want to do it too much (especially the screws that went where the dips in the roof were) and cause it to be slightly curved. I made sure they couldn't easily be turned any more but also weren't super tight, and I left the 2 screws in the dips a bit looser.
-
Next I cut off some of the putty tape that had been squished out a little with a utility knife and stuck it in some places where it was needed. Then I went in with the silicone sealant that I put in a caulk gun and put a generous amount of that around the fan where the putty was of course, smoothed it out with my finger, and then used the excess that was on my finger to put on top of the screws. Don't forget to seal the screws! Then I triple checked to make sure there was no gaps between the roof and fan and let it dry.
-
The bottom part of the fan goes on once you've done your insulation and ceiling. Once I finished those things, I put the piece in where its suppose to go and held it up as far in as it could go then traced around the top of it (the piece is made extra long so that it fits everyones van, everyone has to cut different amounts off depending on how think their insulation nd celling are). Then I measured the distance from the line to the top of the piece and drew a line from the bottom of the piece that same distance. So you basically just want the line to be the same distance from the bottom as it was from the top so it fits in there nicely. I used a saw to cut along the second line I drew, made sure it fit, pre-drilled holes, then used the 4 screws provided with the fan to screw it into the ceiling and you're done. It definitely helps to have someone hold it while you drill. I will talk about the wiring of it separately.
NOTES:
- Sorry for not having the video clip version of this but I promise his is actually one of the easiest and least time-consuming parts of the build so don't worry too much about it. Most people are scared of cutting a hole in the roof, especially since for most its usually one of the first steps, but it truly does not matter if the hole isn't perfect so don't stress about it, as long as you seal it well with putty and caulk or whatever you use, it will not leak.
-Do not use the separate bottom piece of the fan to trace on the roof, it goes on the inside of the fan and therefore you will have to recut the metal because the hole will not be big enough.
- This might seem like one of the more daunting steps but honestly, as long as you can saw a straight line, it's pretty easy. The fan came with an instruction manual which I didn't even look at because it was that simple to figure out.
- There are 2 main brands of ceiling vents, Fan-Tastic and Maxx-Air. The latter is slightly more expensive but I'm guessing also slightly better quality. They have 3 models for fans which you can see the details of on their website here.
-
Fan-Tastic Vent has 5 models, which you can see the details of here. I have the second least advanced one (model 1250). The feature it has that makes it one up from the least advanced one is that it blows air both ways.
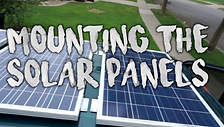
MOUNTING THE SOLAR PANELS
VIDEO
SUPPLIES I USED:
-
3 100 Watt 12 Volt Monocrystalline Renogy Solar Panels (purchased a solar starter kit that came with a charge controller) (also comes with the screws and other parts needed for installation) - $450.99
-
Water, scrubber + towel
-
Mastix Butyl Tape 3/32" x 3/8" x 45'
-
General Electric Silicone Sealant
-
Caulk gun
-
Pliers
-
Sharpie
-
Drill + drill bit
-
Awl
-
Socket wrench
-
Wooden skewer (a chopstick works as well)
-
Total cost: $450.99
STEPS:
-
The first step was, just like with the fan, to clean off the roof with water and a scrubber brush, then dry it.
-
Next I attached the bracket to the bottom of the panels. There are instructions on how to do all of this on the website which really help. It shows the right way to put the brackets and which order to put the nuts and washer-looking things on the screw and so I just followed their diagrams. I tightened the nuts using 2 pairs of pliers, one on each side of the screw.
-
Then I placed the panels on the roof and tried to put them in the best place possible. I left a little more room on the side the wires would be. Once I arranged them, I marked the holes with sharpie and took the panels off the roof.
-
I predrilled all the holes, again like with the fan, making sure the drill bit wasn't bigger that the screws. Before putting the panels back up, I put 4 strips of the butyl tape on the bottom of each bracket, cut off the excess with a utility knife, and used an awl to poke through where the screws would be going so I'd be able to line them up with the dots on the roof. I also cut the zip ties holding the wires together so I'd be able to pull them our later.
-
Then I put the first panel on the roof and began screwing in the screws, doing one in each corner first, then going back and doing the 2nd in each corner to distribute the force evenly. I didn't tighten them all the way down with the drill, so I then went back in with a lug wrench and tightened them. Since there was a slight curve to the roof, I didn't tighten some of them all the way, but as long as they're secure- it's all good. You don't want to make any of them so tight that it's deforming the roof.
-
I filled in any places under the brackets that needed more of the butyl tape then with the silicon sealant + caulk gun, I went around the brackets and screws to seal them up. Getting the side of the bracket underneath the panel was not easy so I used a wooden skewer to apply it under there as best as possible. I just loaded up the end of the skewer with the sealant, stuck it under the panel and tried my best to evenly apply it along where the bracket met the roof. I then smoothed out the sealant in the places I could. I waited until later to do any of the wiring.
NOTES:
- If you have a little more money to spend and want your van to be more stealthy, aerodynamic, and light, I'd recommend going with flexible solar panels.
- When it comes to polycrystalline vs mono crystalline panels, all you need to know is that mono is slightly more efficient and therefore slightly more expensive.
- There are many different companies that make solar panels out there so do your research to find which one you think has the products that will be best for your situation.
- It can be hard to calculate how much energy you will be using and therefore how many panels you'll need before hand if you don't know anything about volts and watts and all that stuff, there are online calculators out there but I found them to be pretty confusing so I honestly just found it bet to look at how many panels other people had and what items they were powering with them to try to figure out how many I would need. That might not be the most accurate strategy but if you're not good at the electrical stuff, it might be the best option.
- Something I didn't do that I should've was lined them up on the ground at the distances apart I wanted them before putting them up top and making sure that the wires from the underneath of the panels could all reach each other. I will talk more about this later but I ended up having to buy extension wires because the 3rd panels wires didn't reach the wires from the other panels.
WIRING PANELS INTO THE VAN
VIDEO
SUPPLIES I USED:
-
1.5 ft 12 AWG Solar Extension Cables x2 - $15.98
-
MC4 Branch Connectors x4 (come with panel kit)
-
20 ft MC4 Adaptor Wires x2 (come with panel kit)
-
Mastix Butyl Tape 3/32" x 3/8" x 45'
-
General Electric Silicone Sealant
-
Caulk gun
-
Multimeter
-
Cardboard boxes the panels came in
-
Utility knife
-
Sharpie
-
Drill + drill bits
-
Sand paper
-
Wet/dry vac
-
Total cost: $15.98
STEPS:
-
The first thing I did was used a multimeter to make sure the panels were working correctly. You should probably do this right when you get the panels but if not, definitely do it at this step. A multimeter measures electrical current and all you do is put the negative wire from the multimeter into the negative MC4 connector and the same with the positives and turn the multimeter on and make sure that you see the numbers changing from 0. Do that for each panel.
-
Then I cut out pieces of the cardboard that the panels came in so they would cover the panel while working with the wires. I'll be honest, I wasn't sure if it was necessary to do this at this step or if it's when you're connecting the panels to the charge controller and other stuff that you're suppose to cover the panels so they aren't generating any electricity (also i apologize if any of the electrical terms i use are incorrect) but i figured its better to be safe than sorry. Working with solar panels and batteries can actually be very dangerous so this is where you need to do a lot of research and read through the instructions that come with your items.
-
There are 2 ways you can connect the panels: series and parallel. I recommend researching both of those to understand what they mean and figure out which way would be best for you is you have more than one panel. Most people will end up connecting them in parallel (which is what I did).
-
There are 2 wires that come out of each panel. One positive and one negative. On the panels I purchased, there are + and - symbols on the wires to help you identify which is which. I first attached the extension cables to the end of the wires on the 3rd panel (the one closest to the front of the van). Then I took the first MC4 branch connector with the 2 negative openings on the bottom and 1 positive on the top and connector the 2 positive wires from the 2nd and 3rd panels to form one positive wire. I did the same with the negative ones (the MC4 brand connector would then have 2 positive openings on the bottom and 1 negative on the top). So by doing that, you take 2 positives and 2 negatives and make 1 positive and 1 negative wire. Then I took the positive wire from the 1st panel and connected it to the end of the positive MC4 branch connector that was used to connect the other 2 panels- I connected those 2 wires with another MC4 branch connector, and did the same for the negatives. So that took the originally 6 wires (2 from each panel) and turned it into only 2 wires, 1 positive and 1 negative. It might seem confusing but it is pretty self explanatory once you have the items in front of you. Make sure to double check that the connectors have all snapped into place so they don't come apart.
-
Next I snapped the 2 20ft wires (that have an MC4 connector on the ends) into the 2 positive and negative wires that came from connecting the panels together.
-
I then went into the van to determine where I should drill the holes for the wires to come in. I had already determined the location of where I would be putting the battery, charge controller, and inverter, and I wanted the wires to come into the van as close to that area as possible, so I chose a place close to the back right corner of the roof, and marked it as close as I could tell from above with a sharpie. I took a small drill bit (it's a good thing to do this if you 1. don't have good drill, 2. don't have good drill skills, and/or 3. aren't very strong- it makes it easier than going straight to the bigger drill bit) and make a hole for the first wire. Then I went back in with a bit that was slightly bigger than the wire. I made sure the wire fit through, rolled up some sand paper, and sanded the inside of the hole so it wouldn't cut up the wire since I wasn't using a grommet, which is another option to help keep the wire protected and the hole less likely to leak.
-
Once I made both holes (which were about an inch apart), I cleaned up the metal filings with the wet dry vac, both on the roof and inside the the van. Then I strung the wires through their holes, leaving a little bit of excess on the roof.. just in case.
-
Lastly, I sealed up the holes by taking a little bit of butyl tape and pressing it on all sides of the holes. Then I went around with some silicone sealant, applied a generous amount of it, and smoothed it out. I just left the wires at the length they were inside the van until much later when I put the other electrical related stuff in.
NOTES:
- If you are getting the exact same panel kit as me and placing them in the same way as me, I would recommend getting the 5 foot long extension cables (don't forget to buy 2 of them!) because I was just barely able to connect my panels together. If they would have been a few more millimeters apart, I wouldn't have been able to get them together. If you don't want to have to buy the extension cables, then place one panel the normal way, with the cords coming out toward one side of the van, and rotate the other two 90 degrees so that their wires are coming out toward the first panel and I think that should make them close enough to all be connected. It's smart to lay them out before putting them on the roof in the formation you're planning on using to see if it'll work.
- ALWAYS make sure you're doing things safely. It is possible for someone with no electrical knowledge to do this but you have to be careful and know what not do to.
- The instructions I followed for the Renogy kit can be found here. It might be helpful to read through some of this even before you purchase panels and even if you're not purchasing through this brand because it can help you get a little bit of an understanding of how all the solar stuff works.
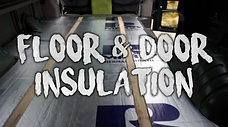
FLOOR & DOOR INSULATION
VIDEO
SUPPLIES I USED:
-
1" x 4' x 8' R Max R6 Polyiso Insulation, 2 @ 15.31 - $30.62
-
1" x 3" x 8' furring strip board, 3 @ 1.55 - $4.91
-
Gorilla 14oz Spray Adhesive - $9.97
-
General Electric 10.1 oz Clear Iron Grip Caulk - $8.41
-
Tape measure + T-square ruler + regular ruler
-
Sharpie
-
2 sawhorses
-
Utility knife + regular knife
-
Wet/dry vac
-
Fiberglass insulation
-
Gloves
-
Jigsaw
-
Caulk gun
-
A few random heavy items
-
A garbage bag + old fabric
-
Total cost: $53.91
STEPS:
-
The first thing I did was lay out the 2 main pieces of wood that would support the plywood floor since I didn't want to screw the plywood into the foam insulation (some people do so I'm sure it's possible but I chose not to). I put them so the edges were on the raised part of the floor (not sure if thats the best way to do it but that's how I did) and then the middle was in the part that dips down. I tried my best to make sure that that they were even distances from each other and the sides of the van to make it easier to cut out the insulation. I then marked the corners with sharpie so if they moved I'd be able to put them back into place and labelled them left and right so when I took them out I wouldn't mix up which goes on which side.
-
The wood did not go all the way to where the carpet in the front of the van ended so I needed to measure how long that distance was and mark that with sharpie on my 3rd piece of wood. I then put the wood on the 2 sawhorses and used a jigsaw to cut the pieces.
-
Next I measured the width I needed to cut the insulation (for the piece that would go in between the wood and be a perfect rectangle), put the foam board on the sawhorses, marked the line with sharpie, used a utility knife to start the cut, then just used an old kitchen knife to cut the foam. What I learned the hard way is that it's better to actually cut more off because otherwise you'll spend forever making little adjustments. If you cut too much and are worried about it, you can always use spray foam insulation in the gaps.
-
All the other pieces were not as easy because they were not regular shapes. You can use a sturdy wire to make template around the wheel bases and other things but the wire I had was flimsy so I just did a lot of eyeballing and tons of small adjustments. I ended up making 7 pieces, the 3 main ones on each side of the 2 pieces of wood, 3 pieces that were toward the front of the van (the insulation was the same length as the wood so I needed more to reach the carpet), and one piece that went at the end of the van all the way across the back. For the one on the back, you want to make sure that it's not too far out that the doors don't close.
-
Once I had all the pieces cut, I took everything out and used a shop vac (wet/dry vac) to get all the extra little foam pieces out before I glued everything down. Then I put everything back in.
-
I first started with securing the wood pieces. I decided not the screw them to the van floor because I didn't want to screw into anything underneath the van and have it cause a problem. Instead I used GE Iron Grip Caulk along the edges of the wood where it met the raised part of the floor. Once I glued all the wood pieces down, I took the insulation out and placed a bunch of heavy items on the wood like a chainsaw, some bottles of random fluids like weed killer, really anything I could find in the garage. I let that sit for a while then took the items off.
-
I then used a big garbage bag and leftover fabric that I had taken out of the van to protect the carpet and plastic part around the side door step from the Gorilla spray adhesive I was gonna use for the insulation. Then I just stayed the floor and bottom of one board at a time, let it sit for a few seconds until tacky, then put it into place and within seconds I could not move the boards so I'd say the stuff works pretty good. You want to make sure that during and for a bit afterwards, you open up the doors and windows and allow the fumes to get out. Like I said earlier, you can also use spray foam for the gaps but keep in mind that if you don't use a whole bottle of that stuff at one time, the rest will harden and you won't be able to use it so it might be best to wait until you have insulated the walls and ceiling too.
-
For the doors, I just used the leftover fiberglass insulation that came in the van. I put on some gloves first and then just stuffed as much into each of the back and side doors as I could- and that's it.
NOTES:
- The thicker the foam insulation, the higher the R-value. The higher the R-value, the better it will insulate, but you also want to keep in mind how much room the insulation will be taking up and lessening how tall the interior of the van is.
- You can also use the foam insulation in the doors, but it's probably best that if you're gonna do that, you combine it with fiberglass or spray foam.
- It would probably be smart to make a floor template for the insulation which you could then use again for the subfloor but i only did one for the subfloor and it turned out just fine.
INSTALLING THE SUBFLOOR
VIDEO
SUPPLIES I USED:
-
11/32" x 4' x 8' pine plywood 3 @ 16.53 - $49.59
-
Roll of red rosin paper
-
Measuring tape
-
12 1" screws
-
Drill
-
2 sawhorses
-
Jigsaw
-
Chalk line
-
General Electric 10.1 oz Clear Iron Grip Caulk
-
Caulk gun
-
Milled tooth file
-
Scissors
-
Sharpie
-
Screwdriver
-
Packing tape
-
Heavy objects
-
Duct tape
-
Total cost: $49.59
STEPS:
-
First I measured the length of the floor which and cut a piece of the red rosin paper to about a half a foot over that length to use for a template. Then I laid it in the van toward one side and cut small pieces here and there using a measuring tape, sharpie, and scissors. I did the same then for the other side and only needed 2 rolls of the paper because the van was small enough that they overlapped down the middle. I taped the 2 pieces together in the middle with packing tape and then cut out the places that needed to be cut on the second piece. There were a few places I messed up so i just took some of the scrap paper and used the tape to attach it where it was needed.
-
I then laid the pieces of plywood out on the garage floor. I put two 4' x 8' pieces of plywood next to each other and the 3rd one I had gotten cut in half at home depot and placed the end pieces of that at the ends of the bigger pieces so altogether it made it 8' wide x 12' long. I laid the template on that, placed some heavy objects on it just to make sure it didn't move around at all while I was sitting on it, and began tracing around the template.
-
I placed the plywood on sawhorses used a jigsaw to cut out the pieces. I used a milled tooth file to smooth out the edges then put them in the van (in total I had 4 separate pieces). I used a chalk line to make sure that the screws we were gonna put in would go into the furring strips that were underneath and not the foam insulation. All you do to use a chalk line is unroll it to the length you need, have one person hold the one end of it and you hold the other and press it against where you want the line to be, make sure the string is tight, then lift it up an inch or two and release and it will snap down and leave a line of chalk. You can also just use a string and draw along it with a pencil.
-
I marked where my screws were gonna go, used 4 for each of the bigger sheets of plywood and 2 for the smaller pieces in the front of the van which ended up being about 2 feet long. Then I screwed them in with 1 inch screws. It would've been smarter and easier to pretrial the holes like I did for the fan and solar panels, but I got them all in... then my mom made me take one of the boards out so we could caulk where the 4 corners met and along where the 2 larger boards met because one stuck up a bit. So I did then then drilled the screws in again, used a screwdriver to tighten the last little bit, and placed some heavy items where I caulked, which I left on overnight to make sure it stayed down.
-
The next morning I just put some duct tape over all the 'seams' of where each board met and a little piece over each screw.
NOTES:
- Try to make sure that the plywood you buy is not warped otherwise it will make thing a little harder.
- I am by no means a plywood expert but I do not believe it is necessary to get some super thick plywood. I just got the cheapest one from Home Depot. Not only was it cheaper but it will also be lighter. You always want to be considering how much weight something is going to be adding to the van.
- If you want to make you van look extra nice and you have more money to spend, from here you can go straight to putting in your actual flooring but for myself I didn't care if there wasn't any flooring underneath the bed so I though I'd save some time and money by leaving that for after I have the bed and 'kitchen' in.
WALL & CEILING INSULATION
VIDEO
SUPPLIES I USED:
-
1" x 4' x 8' R Max R6 Polyiso Insulation - $15.31 (+ leftovers from one of the boards used for the floor)
-
Sharpie
-
Knife
-
Measuring tape
-
2 sawhorses
-
T-square ruler + measuring tape
-
Compass
-
Gorilla 14oz Spray Adhesive
-
General Electric Silicone Sealant
-
Caulk gun
-
Dream Lighting 6 pk RV LED Lights - $35.00
-
Cerrowire 24ft 16 AWG Primary Wire x 6 @ 5.70 - $34.51
-
Tyco Electrics Blue 16-14 AWG 10 pk Butt Splices x 2 @ 1.98 - $3.96
-
Duct Tape
-
Needle nose pliers with a wire cutter
-
Jaw locking pliers or crimping tool
-
Electrical tape + duct tape
-
Scrap wood or any items to press the insulation into the wall + ceiling
-
Total cost: $88.78
STEPS:
-
Cutting the insulation for the walls and ceiling is pretty much the exact same as the floor- just measure and cut little by little. The ceiling took up an entire sheet and for the walls I used the leftover scraps from the floor so a lot of those pieces were small and I ended up not having quite enough but not too little that it was enough to buy an entire other piece. I didn't put any pieces where the ends of my bed would be because my mattress was the exact width of the van.
-
I waited a while to actually glue down the pieces, they were just loosely in there for a few days, because you have to do the electrical before glueing the ceiling insulation in, but you can do the walls. you can glue that in whenever. The only difference from the floor is that you don't have gravity on your side so you'll have to fin a way to press the insulation into the walls. I recommend using scrap pieces of lumber. something heavy like a weight to prop it up against, and something flat that can cover a large area of the insulation that you can put between the lumber and insulation so the lumber isn't just pressing on a small surface area.
-
The 2 things that I was going to have to wire prior to putting in the insulation was my fan and my ceiling lights. Things that plug into a regular household outlet (phone charger, fridge, carbon monoxide detector, etc) are not things that need to be wired. Just things with exposed wires at the end which will need to go into a fuse box.
-
First, you have to know what kind of wires you have because you'll have to get extension wires so they can reach when your electrical area will be (mine is in the back right corner of my van, past the bed). Different wires are different sizes so you'll need to purchase wires that are the same gauge (size) as the ones coming from your fan. lights, etc. If you can't find the exact gauge you need (it may say right on the wire itself what gauge it is, or you can often find it in the instruction manual or website for the product), you can get a slightly larger wire, which- not to make it confusing- will have a smaller gauge. For example: The fan I have is 18 AWG (that means its an 18 gauge wire) and the lights are 16 AWG. I went to Home Depot and they didn't have any 18 AWG wires, so I went with 16 AWG for both the fan and lights. The 16 AWG is a thicker wire than the 18 AWG, despite the number being smaller. A slightly thicker wire will not hurt, but I do think that a slightly smaller wire would not be recommended, although I am not 100% sure. Before you shop, it's probably best to try to measure and get an idea of how much you will need. There is a positive and negative wire that come off of each product, so don't forget to count that too. You can get different colored wires to make it easier to distinguish between positive and negative, (there is no difference in purpose between colors, they are just to make things easier to tell apart) otherwise you can just put a piece of tape around the ends and label them with a + and -. Again, it usually will say on the wire or instruction manual which wire is positive and negative. You will also need to purchase butt splicers/butt connectors to secure the wires together (if the product does not come with them). There are different colors of these which are for different gauge wires. The blue ones for example are for 16-14 gauge wires, so those are the ones I purchased.
-
So I started with the fan, taking the + wire and putting it up against where it would run along to see how much I would need, gave it a little extra just in case and cut the end with wire cutters. I ran them to the right from my fan into this area that is meant to string wires through so they were completely out of the way. Most vans I would assume have this feature. Then I made the - wire the same length. Next I cut about half an inch of the protective material that goes around the wire off with a wire cutter/stripper. You want the ends to have a little bit of actual wire (the metal part) exposed for when you put them into the butt connectors so they touch each other. The Fan-Tastic fan actually comes with 2 connectors which is all you need for it, one for +, one for -. It also comes with extra wires (short ones though) which is nice but if you get that fan, do not think that you are suppose to use them, I believe they are just backup. Once I stripped the ends of each wire, I twisted the wires a little bit then put the - coming off the fan into one end of the connector and one of the wires I'd cut into the other end. It's possible to do this alone but much harder so I held the wires in there while my mom used jaw locking pliers to crimp the connector down so the wires don't fall out. You can use a wire crimper to do this but we found it to be way harder. And if the wire seems to be a little loose but you can't push the connector together any more, you can secure it with some duct tape or electrical tape (very tightly!). Then I did the same with the + wire.
-
Before I wired them through the van, I thought it would be a good idea to see if the fan worked first so we brought the battery over and touched the end of the positive wire to the positive terminal of the battery and the same with the negatives. I freaked out for a second when it didn't work but then quickly realized the fan dome thing has to be open for it to turn on.
-
Next I strung the wires through the little wire area that goes along the top of the van and out a hole at the end that my solar panel cables also come through and just left them hanging down there until later. I also taped the wires to the ceiling with duct tape as best as I could where they hung down at the beginning by the fan.
-
I had a set of 6 LED lights so I measured out where I wanted them, used a sharpie to make a dot where the centers would be, took them down, used the dimensions given on the instructions that came with them to make the right radius, used a compass to draw the circle, and cut each hole out with a knife. I put the insulation back up on the ceiling and drew on the actual celling where the outline of the holes were. Then I took the insulation back down again and with some wire (for the lights I used black and white to more easily distinguish between positive and negative) I measured out how much I would need between each light. My lights were gonna be connected in the shape of a backwards S that only has straight lines (like on a digital clock) so the first light would be behind the drivers seat, and that would connect over to the right to the second one behind the passenger seat, then that would connect backward to the third one, which would connect over to the left to the fourth one which would be directly behind #1, and the wires from that one would then run directly backwards to the fifth which would be in the far back of the van, and the wires from that one would run to the right to #6 which would be directly behind #4, and the wires from the last one would run to the right of it, into the same wire area where the fan wires were strung through, and then out the same hole as the fan and solar panel wires. Sorry if I made that too confusing. My point is to make sure to start with the light closest to the electrical area and connect according to that so you don't have to use extra wire.
-
I cut each wire a bit longer than it needed to be. Then I laid out the lights and wires in the order they would be and repeated the same process as connecting the fan wires except for the lights, you will have to connect 3 wires every time except for with the first light. To explain, there are 2 short little wires coming off each light and in between each light there are wires that go from each one, so you will have to, for example, connect the wire that connects light #2 to light #3... to the wire that comes from light #3... to the wire that connects light #3 to light #4. For this you can just twist two of the wires together and put them both (doesn't matter which ones) into the same side of the butt connector and the single one just in the other side.
-
Once I connected them all together, I tested them with the battery before putting them in the ceiling. The small mistake I made was not realizing that I would have to take some the the connectors off (the ones from lights 2 to 3 and lights 4 to 5) so we could get the wire through a the small gap between the ceiling and the beam that ran across it. So I detached the connectors between those lights. I spaced the lights apart so that there were none in my first piece of insulation (where the fan is) and 2 in each of the other 3. So I started with the 2 closest to the front of the van, stuck them through their holes in the insulation, and duct taped them to the insulation so they wouldn't hang down too far. Then I strung the wires we had to disconnect through the gap and my mom held up the insulation board while applied spray glue to the celling and board. We then pressed it up into the ceiling for a few hours with some old pieces that came in the van and a few other random objects. Unfortunately the glue did not hold very well so we tried using the silicone sealant that I had used for the solar panels and fan. That worked better- it didn't hold the middle up completely (the van roof is curved) but all it needs to do is hold it in place until the ceiling panels go up and then those will hold it a little more... but you also probably don't want them so lose that after the ceiling is put in, they fall and make noise moving all around where you're driving.
-
Before putting in the panel with the second set of lights, we just reattached the wires where they were disconnected and repeated the same steps as earlier. Then we strung the wires coming from the last light down to where all the other wires were.
-
Lastly, I strung three new wires from where the the + and - light wires ended, back up through the little wire tunnel and brought them down half way across the van to the area to the right of the side door where I was going to be putting the light switch (one for the positive, one for the negative, and one for the ground) and just left them not connected to anything until later. I did this part wrong but it ended up working fine. What you should do is string the - light wire to the electrical area but the + light wire to where the switch will be, then only 2 wires from the switch to the back, + and ground. All I did was a little extra wiring.
NOTES:
-If you're not sure what gauge your wires are, you can always just snip off a little piece and bring it with you to the store to compare or ask an employee.
-When I first used the spray glue, I put part of a large garbage bag around the fan to protect it from the glue, so if you have better quality glue and decide to go that route, make sure to protect the fan!
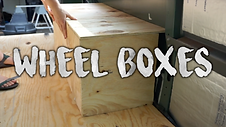
WHEEL BOXES
VIDEO
SUPPLIES I USED:
-
Scrap pieces of 11/32" x 4' x 8' pine plywood from the subfloor
-
T-square ruler + 90 degree ruler + measuring tape
-
Sharpie
-
Jigsaw
-
2 sawhorses
-
Safety glasses
-
Nail gun + nails
-
Fiberglass insulation
-
Everbilt 1.5 inch 4 pack corner braces (L brackets) - $1.97
-
1 inch screws
-
Total Cost: $1.97
STEPS:
-
For the wheel boxes, they are not a necessary thing to do but they just make the van look a little nicer and probably some other things I don't know about. I first measured out what I'd need to cut, used a t-square ruler and sharpie to make my lines on the plywood, and cut out the front piece and 2 side pieces. I made sure to make the length that I needed to cut of the 2 side pieces include the width of the plywood that would be used for the front board.
-
Then once I cut those 3 pieces and made sure they all fit, I measured how much I would need for the top piece, again including the width of the plywood for the other pieces so that the top piece would go over them, and cut out the top piece.
-
I used a milled tooth file to smooth the edges out a little bit and then put the pieces in the van and checked to make sure they all fit well.
-
Next, I used a nail gun to attach the pieces together because since the plywood I used was pretty thin, screws might have been a little to big to screw in there. It was actually pretty easy to use and although a few of the nails came out the side, all I did was bend and snap them off and then do another right next to it. I used a 90 degree ruler and put a few heavy objects on each side to stabilize the first 2 pieces when nailing them together.
-
I put the box into the van and again checked to make sure it was all good- then I took some fiberglass insulation my parents just had laying in our garage and cut a piece long enough to fit right into the box.
-
After putting the insulation in, I made sure the boxes were the same distance from the back of the van so that when the bad frame went around it, it wasn't slanted at all. I then took four 1.5 inch L brackets and used 2 for each box (one on each of the 2 sides), and drilled them in with 1 inch screws. There were 4 holes in each bracket but I only used the 2 outer holes because my drill couldn't get that close to the inner ones and the boxes seemed pretty sturdy anyways.
NOTES:
-If you are going to be putting something (like the bed frame) directly on the wheel box, you will want to add more support in the form of like a 2 x 4 going across underneath the top back and maybe some 2 x 2's inside the back of the sides as well but I made my bed frame just a few mm's above it so no weight was going directly on it.
-Don't screw the wheel boxes to the floor until you're sure you can get the bed frame in without having to take one or both out if your bed is going to run widthwise.
BUILDING THE BED
VIDEO
SUPPLIES I USED:
-
2" x 4" x 8' lumber strips x 3 @ 4.32 (+ 1 we had lying around) - $12.96
-
2" x 2" x 8' lumber strips x 2 @ 1.84 - $3.68
-
1" x 3" x 8' lumber strips x 2 @ 1.55 - $3.10
-
11/32" x 4' x 8' pine plywood - $16.53
-
Everbilt 1.5 inch 4 pack corner braces (L brackets) (+ 2 more that were leftovers from another package) - $1.97
-
T-square ruler + tape measure
-
Screwdriver
-
Milled tooth file
-
Jigsaw
-
Drill + drill bits
-
Belt sander
-
Circular saw
-
2.5" and 1.5" screws
-
Safety glasses
-
Brush or broom
-
Polyurethane + paint brush
-
General Electric Silicone Sealant + caulk gun
-
Extension cord + outlet strip
-
Carbon monoxide detector - $28.95
-
Total cost: $75.17
STEPS:
-
I first put my mattress on the wheel boxes to get an idea of what it would look like an measured the length and width (you can just measure it without putting it in the van). You will also want to take into consideration how much space will be above the bed (can you sit fully straight up?) and how much will be below for storage. Then I measured that out on pieces of 2" x 4" x 8' lumber strips and then cut with with a circular saw which isn't the best idea for this kind of wood, so I'd recommend a jigsaw. I filed down the edges with a milled tooth file and then laid out my piece of the ground. I had 3 pieces of wood that went widthwise (one in the middle and the other two on each end) and then the 2 lengthwise pieces which I put on the outside of the 3 inner pieces. I used 2.5 inch nails to secure them together while my mom held down the wood so it wouldn't move. I put 2 screws in each area, doing the top one (as its laying down on the ground) all the way around and then flipping the frame over and doing the rest since it's hard to get the drill that close to the ground. So in total I used 12 screws.
-
Then we had to bring the frame in from the side doors because it was impossible to get in from the back. If the long side of your bed is going to run parallel to the long side of the van, then you won't have to worry about this but since my frame was just a few inches shorter than the width of the van I had to take out one of the wheel boxes in order to get the frame in, which we were just barely able to get in (there were parts of the van that stuck out a lot on each side in front of where the bed frame would be that made it difficult).
-
We lifted the frame just a few mm's above the wheel boxes (so no pressure was going directly on them since I didn't make them that sturdy) and measured from the floor to the top of the frame, cut out 6 legs for the bed from two 2" x 2" x 8' lumber strips. and repeated the same cutting and filing process as with the 2 x 4's. Then I used 2 screws for each leg and screwed the 4 corner ones to the outside of the frame and the two middle ones to the inside. I used a drill to drill them like 95% of the way then went back in with a screwdriver for the last bit.
-
Next I cut 4 slats from two 1" x 3" x 8' lumber strips. I used the same process as the other parts of the bed, except I made sure to cut them a tiny bit longer than they would need to be. The slats go on the inside of the frame, between the two long sides, and I spaced them out evenly, avoiding any knots in the wood though so it wouldn't be too hard to screw them in. I used a milled tooth file on the end and then a belt sander to get them down to the right length. I wanted to be able to just barely fit them in there so I made them just short enough to be able to fit but not too short that they would fall out before they were screwed in.
-
Then I used two 2.5 inch screws for each area that needed to be connected (so 16 total). I tried my best to make them completely even with the top of the frame so the plywood that would go on top would put some of its weight on them, but I also didn't want them to be above the frame.
-
Next I measured the dimensions of the entire frame and cut that out of a 11/32" x 4' x 8' piece of plywood with a circular saw. I made the edges nice with the milled tooth file then went in with the belt sander and slightly curved the edges and corners with it, and then also the whole top of the board.
-
I swept all the sawdust off and then used polyurethane on only the top. I would not recommend doing this- the only reason I did was because my mom told me it would protect the underneath of the mattress. You could maybe try just using paint or anything that isn't going to smell for days or forever- or you could just sand it really well.
-
After that we tried to fit it in the van and realized it wouldn't so I cut the board in half with a circular saw and put it in that way. I used 1.5 inch screws to secure the plywood to the frame and 1.5 inch corner brackets to secure the 6 posts to the plywood subfloor with the same screws.
-
I was going to be putting an extension cord and outlet strip from where my electrical stuff would be to the front side of my bed by where the kitchen would be so I first put a ton of silicone caulk around the back floor insulation. After it had dried, I pulled the extension cord through the wheel box. I had to attach a string to the end to be able to pull it through. Then I put it as out of the way as I could, running it along the floor and once I got to the end and could see how much extra cord I had, I stuffed some of it back into the wheel box.
-
Next I had to take out the corner bracket on my bed post by the side door to slip the cord for my carbon monoxide detector through it. I put some silicone caulk on the back of wire clips that had come in my van and put 4 of them along the inside of the bed frame, waited for them to dry, then ran the wire through them.
-
Lastly I stained the front of the bed with a dark brown color that I also used for the kitchen, ceiling, and door panels.
NOTES:
-Before you build the frame, make sure to glue down any insulation that might be inaccessible after the frame is secured down. You may also decide to do the same with the wall but I decided not to because I didn't care if my build was super clean cut.
-Make sure that when shopping for lumber strips, you are laying them on the ground and turning them on each side to see if they are warped, and then get the straightest ones you can.
BUILDING THE KITCHEN
VIDEO
SUPPLIES I USED:
-
2" x 3" x 8' lumber strips x 3 @ 2.84 - $8.52
-
2" x 2" x 8' lumber strips x 2 @ 1.84 - $3.68
-
1" x 3" x 8' lumber strip x 2 @ 1.55 - $3.10
-
11/32" x 4' x 8' pine plywood (+ leftovers from another piece)- $16.53
-
1/4" x 4' x 8' sanded utility plywood - $11.66
-
90 degree ruler + T-square ruler + tape measure
-
Screwdriver
-
Pliers
-
Hole saw
-
Milled tooth file
-
Jigsaw
-
Drill + drill bits
-
Safety glasses
-
3.5", 1.5", and 1" screws, and very tiny ones that were about the width of the plywood
-
5 gallon Hedpak water jugs x 2 @ 17.00 - $34.00
-
Kingston 16" x 16" x 8" Stainless Steel Sink - $68.57
-
Houzer 2 inch Sink Drain - $12.06
-
Valterra hand pump faucet - $31.66
-
Everbilt 1.5 inch 4 pack corner braces x 2 @ 1.97 - $3.94
-
3/8" ID x 9/16" OD x 10' Sioux Chief clear vinyl tube - $3.46
-
3/4" ID x 1" OD x 10' Sioux Chief clear vinyl tube - $14.99
-
Everbilt 1/4" x 2 1/2" Screw Eye (2 pk) - $1.98
-
1/2" - 1 1/16" Breeze Hose Clamp - $0.85
-
Camco Camper Drain Trap - $5.70
-
Belt sander
-
Circular saw
-
Nail gun + nails
-
Pencil
-
Wire cutters
-
Varathane 1 Qt Espresso wood stain + foam brush + towel
-
Polyurethane
-
White paint + roller + tray
-
2 sawhorses
-
Hammer
-
Level
-
Liberty 3/8" Inset Hinges (pack of 2, comes with needed screws) x 2 @ 2.98 - $5.94
-
Everbilt Double Roller Catch x 2 @ 0.98 - $2.94
-
Total cost: $229.58
STEPS:
-
I first figured out where I wanted the kitchen to be, how far I wanted/needed it to come out for the sink and water jugs to fit, and how much room the fridge would take up lengthwise (which I would be putting to the right of the kitchen- right behind the drivers seat). Then I took my measurements. The top piece of the frame would just be a rectangle but because there was something sticking out of the wall (which has to do with the gas), the bottom piece of the frame had to be a little bit of a different shape to go around that. I used 2 x 3's to make the top and bottom pieces and when putting them together used two 4 inch screws for each corner. Because of the thickness of the wood it was quite hard to screw the screws in. We ended up putting the boards up on the plywood of the bed and I used a 90 degree ruler to make sure the boards were going the right direction then I kneeled on one of the boards while holding the other one down with my hands to keep them steady and my step dad predrilled holes then drilled in the screws. I made both bottom and top pieces before measuring for the height.
-
Next I put my water jugs where they would go, put the drain in my sink and held my sink a few inches above the water jugs. I wanted to make sure that when the tube that goes from the drain to the grey water jug is attached, there will be enough room heightwise between the 2 so that the tube won't dip down and rise back up and cause water to sit in the tube. From there I measured the height, and this time used 2 x 2's in the 4 corners. I set the top piece up on 2 sawhorses and then placed the "legs" I guess I'll call them underneath. For these We only put one screw in, between the two screws that ran the other way on the top piece, again using a 90 degree ruler, pre drilling holes, and using 4 inch screws. For extra support we put one corner bracket on each corner (so 8 total), using 1 inch screws and making sure not to drill into any previous screws. Then we flipped it over and put the bottom piece on the same way (except not on sawhorses of course).
-
Then I also added a 1 x 3 in the middle of the front (going from top to bottom) so that when doors were put on, it would make the front sturdier.
-
For the sides (I didn't put anything on the bottom and used plywood for the countertop and doors) I used sanded utility plywood (which I call paneling/boards). I just measured, cut it out using a jigsaw, and filed it. Then I nailed it in with a nail gun (you can use screws if you want, nails just make it look a bit nicer- depending on what look you're going for I suppose) and sanded the edges with a belt sander if they were too long. For the front and back pieces, I made sure to add the width of the board x2 so that they would cover the ends of the side boards.
-
I was going to be just putting two simple doors on my kitchen, no drawers because those have to be much more precise and I've seen a lot of van lifers with ones that are hard to open because they aren't professionally made. I first figured out how big I wanted the holes to be (keeping in mind the jugs had to be able to fit through), then made my lines on the paneling, drilled a hole in each with a bit larger than the jigsaw blade so I could get it through, cut each one out, filed it, sanded it, and nailed it down. The nails went through the 1 x 3 piece so I just used wire cutters to snip of the ends.
-
For the countertop, I cut a piece of plywood to be a little bit wide and longer than the frame. I then sanded the edges, corners, and top really good, especially the top-making sure it was as smooth as possible. I also made sure the piece didn't have any nots in it (it did have one actually put it was where the sink would be so it would be cut out).
-
I then drew around the template that came with the sink and used a tube of caulk that was the same size as the hole that would need to be made for the faucet to trace. I filed both holes a little bit.
-
Next I stained the entire thing except the counter top, which I painted white. I even stained the inside which might seem dumb but I had a lot of stain so I figured why not. I used a towel after applying the stain with a brush to spread out the stain and make it lighter.
-
I had enough room in the back to make a small shelf above and behind the water jugs so I cut a 1 x 3 in half lengthwise and screwed the two pieces underneath a piece of paneling. The screws went through a tiny bit so i just took a hammer to make the ends less sharp. I also took another halved piece of 1 x 3 and put one half on top of the shelf along the front and nailed that to the paneling. Then I put the shelf into place, propped it up with a few scrap pieces of plywood on my water jugs so it wouldn't move, used a level to make sure it was of course level, and then nailed it in from the sides and back (only in the areas where the 1 x 3's were. I put the other half of the second 1 x 3 about 2 inches above the top of the shelf along the front to keep thing from falling out. I nailed that in as well. To make sure I was nailing in the right place, I just measured how far from the back and top the boards were (on the inside), then went to the outside and did the same measurements.
-
Onto the doors: In order for the hinges to not just screw into the thin panelling, I put a piece of 1 x 3 on the inside of each corner where the hinges would go. I also cut out the doors from plywood, making them about a half inch larger than the door holes on each side, and sanding them the same way I did the countertop. Then I put the hinges an equal distance from the top and bottom of the doors and screwed them in with the screws that came with them. I then put the doors where I wanted them to be and screwed the hinges to the kitchen. I had to sand off part of the doors because (since I'm not an expert on cabinetry and kind of just guessed on what type of hinges to get), they kind of scraped the paneling when they were shutting.
-
I used a double roller catch to make the doors stay shut. For that, I again nailed a small piece of 1 x 3 to the top inner corner of each side and used the screws that came with it to secure the one piece to the 1 x 3. Then the other piece goes on the plywood door and to make sure that lined up, I put it in the inner piece and closed the door then drew around the edges of it. I had to use tiny screws to put that part on. I used a drill to start the holes for the inner piece and a screwdriver to finish and a screwdriver for the entire process on the part that went on the doors.
-
Then I stained everything that wasn't already stained and polyurethaned the whole thing- except the countertop, which I first nailed down, repainted, then polyurethaned lightly.
-
I used two different size hole saws to drill a hole into the caps of my water jugs. For the tube from my faucet, I used 3/8" ID (inner diameter) x 9/16" OD (outer diameter) clear vinyl tubing and for the sink I used 3/4" ID x 1" OD. I used some sand paper to sand the holes a bit. I got the wrong type of drain for the sink so I had to purchase a camper drain trap (make sure the drain you get is made for rev's because regular sink drains are made differently). My drain had a top, middle, and bottom piece, all of which unscrewed from each other. I discarded the bottom piece, put the top piece in the hole in the sink for it, and screwed the drain trap onto the bottom of the middle piece, then put that under the sink and screwed it into the top piece. Then I took the tubing and cut it to the right length with a utility knife and put a hose clamp on it, then slid it onto the part of the drain that it goes onto, then tightened the hose clamp with a screwdriver.
-
In order to make sure my jugs didn't tip over, I decided to put a bungee cord through their handles. I predrilled holes in the back sides of the 2 x 3's that were right underneath the shelf, then with a pliers I screwed in a screw eye to each side so the bungee cord could hook onto those.
-
To secure the sink, I caulked around the opening in the counter and also underneath the part of the sink that would sit on the counter, then pressed it in and wiped off and excess with a towel. I put the faucet into it's hole and used the screws that it came with to secure it down. Then I put the tubes into the jugs. I made the faucet one long enough to reach the bottom of the jug but the sink one only goes in about an inch.
-
I didn't secure the kitchen to the floor until after I did the walls and before I was about to install the flooring.
NOTES:
- Make sure that when measuring how wide you want the kitchen to be to take into account that when you drill the hole for the sink for example, you don't want to obviously be drilling into the frame itself so if the sink is, say, 8 inches wide- make sure the inside of frame is larger than 8 inches wide, or if your water jugs or whatever else is larger, then make sure those fit before screwing everything together. Then also take into account where the faucet will go. Since mine was going in the back right corner of the sink, I didn't need to have that much extra space open behind the sink.
- If you don't have a nail gun, see if you can borrow one from someone who does, or some places let you rent one.
CEILING
VIDEO
SUPPLIES I USED:
-
5/16" x 3 9/16" x 8' Cedar Tongue and Groove Paneling (6 per pack) 4 @ 17.98 - $75.88
-
2 1/8" Hole Saw
-
Pencil
-
1" metal screws
-
Screwdriver
-
Milled tooth file
-
Jigsaw
-
Drill + drill bits
-
Safety glasses
-
Chop saw
-
2 sawhorses
-
Wood putty + spreader
-
Dap Silicone Sealant + caulk gun
-
Towel
-
Small paint brush
-
Polyurethane + brush
-
Interior part from fan + the screws that come with it
-
Total cost: $75.88
STEPS:
-
This is one of those parts where you pretty much need at least one other person to help you do it. You want to start in the middle of the ceiling and work your way out. One thing we made sure of before starting was that the places where we would need to cut out for the lights would not be in the middle of one board (because it would be more likely to break) but rather we would be cutting a half circle out of two boards for each light. And for cutting out for the fan, we didn't want a super skinny strip for the same reason before but luckily if we placed the first board right in the middle, the fan and lights would be just the perfect distance away to make sure that wouldn't happen.
-
To start, we lined up the first board from the back of the van to the edge of the fan, and I marked in pencil where we would need to cut so it was pretty even with the insulation. It can be a little off because the interior piece of the van will cover the ends. Then I used a chop saw (which would have been great to use for so many other steps of this project had I been told we had one earlier) which makes the ends of the board perfectly straight. You can use a jigsaw or circular saw along with a belt sander if you don't have one, just do your very best to make it as straight as possible. Then I filed the end with a milled tooth file.
-
While my mom and I held up the board, my step-dad pre-drilled a hole into the back beam. There are 5 total beams in my van (that are exposed) and so we drilled into each of those. Then, he used a 1 inch metal screw (make sure it's small enough that it's not going to go through the roof) to secure the board. Then we went over to the next beam and did the same thing, and again with the 3rd and 4th beams.
-
For the rest of the boards, we staggered them slightly just to make it look a bit nicer. So the only board that went the full length from the back of the van to the fan was the first one and that was just to make sure it was straight. We staggered them so that one board went from beam 1 (the farthest one back) to beam 2 and then from beam 2 to the front, and the next over would go from beam 1 to beam 3 and then from beam 3 to the front.
-
Once we came to the lights, we set the board up where it would go, putting the tongue in the grove, and in placed the light on the board where it would go and traced the half circle. Then my step-dad used a 2 1/8" hole saw to make the half circle. We put a piece of scrap plywood under the board to drill into so the board wouldn't break. We just used the dimensions of what size hole needed to be cut that came on the instructions for the light to figure out what size hole saw was needed. I made sure the light fit and filed off the rough parts.
-
For the fan, about half of the board needed to be cut into. Again, we placed the board exactly where it would go, then took a scrap piece of the paneling and put it between the board and fan, butted up again the insulation and drew a line on the scrap board to determine how much of the board needed to be cut off. I also drew little lines on the regular board where it would need to be cut for the front and back. Then we took the panel down and used the line I drew on the scrap panel to determine how deep the cut would need to be and connected that to the other lines I'd drawn, and cut it with a jigsaw.
-
For some reason, almost every screw that went into the 5th beam (the one closest to the front), split the board a little bit or, in two places, (both where the fan cutout was) completely. What I did for that was filled the crack in with a little bit of wood filler.
-
For the 3 little boards that would go between the front of the van and the front of the fan, which were only a couple inches long, we put a little bit of silicone caulk on the top and screwed it into the one beam. The interior part of the fan will hold them securely once it's put on.
-
When putting a board in, we found that it was easiest to get the tongue in the groove when the screws from the board next to it were loosened a little bit. Sometimes, the boards were a little warped and had to be pressed against really hard in order to get them to go into the groove.
-
For the middle 3 beams, there was the main part of the beam that we screwed into, a little indent, and then the same part of the beam that was screwed into. So I would cut the boards so they'd end in the indent area so the screws from each of the boards going in that line could screw into each of the regular non-indented sections.
-
Once we got to the last board for each side, we were lucky that on one side, the board fit perfectly and we didn't need to cut it at all and the other side, only a bit of a corner needed to be cut off because I think all the boards were just slightly diagonal.
-
Then I used the same stain as the kitchen on them, using an old towel to apply it. Around the screw holes and in between each board where the towel couldn't get to, I used a small paint brush. The next day I polyurethaned it and once it was dry, I put the lights into the ceiling. They all happened to stay in just fine without me using the screws that came with them, so I just stuck them up in there and twisted on their covers.
-
Lastly, I put the interior past of the fan up in the slot (not sure what else to call it) where it would go. Don't get worried if this takes you like 5 minutes to do because for some reason it's really hard. The piece is made very long so that you can cut off what you don't need so I made a mark on the interior part where it met the ceiling. Then I took it down and measured the distance from the line I drew to the end/top of the part, which came to be 1 3/4 inches. Since it didn't matter if the part was cut a little bit shorter than the longest it could be, I decided I would make it 1.5 inches so I didn't have to do any extra cutting if it wasn't enough the first time. So then I drew a line all the way around that was 1.5 inches from the bottom of the fan part. I used a jigsaw to cut it which was a little tricky (there might be a better thing to use but I don't know what it would be) because the saw gets really hot and melts the plastic which then cools very quickly and sticks back together. What I found to work was to hold up the fan part with one hand and brace the bottom between my feet. Then as I cut the plastic, I would lift up the part that would be discarded so it wouldn't dry back together. I then filed off the rough edges with a milled tooth file, placed it back in the slot (with much more ease this time) and drilled in the 4 screws that came with the fan, then tightened them with a screwdriver.
NOTES:
-Always cut the boards with the good side facing up so that the little edges that come from cutting will only be noticeable on the side that you wouldn't be able to see.
WALLS
VIDEO
SUPPLIES I USED:
-
1/4" x 4' x 8' sanded utility plywood x 2 @ 11.66 each - $23.32
-
2" x 2" x 8' lumber strip
-
1" x 3" x 8' lumber strip
-
Screwdriver + flathead screwdriver
-
Milled tooth file
-
Jigsaw
-
Drill + drill bits
-
Safety glasses
-
Belt sander
-
Chop saw
-
Table saw
-
2 sawhorses
-
Wood putty + spreader
-
Gorilla Paintable White Silicone Caulk - $8.97
-
1" screws
-
Tape measure
-
Old towel
-
Pencil
-
White paint + roller + foam brush + tray
-
Nail gun + 3" nails + 5/8" nails
-
Red rosin paper + scissors
-
Painters tape + duct tape
-
Cardboard
-
Respirator Mask
-
1 Qt Body Filler Bondo - $15.47
-
Silicone Spatula x 2 @ 1.06 each - $2.12
-
80 grit + 400 grit sand paper
-
First Alert Carbon Monoxide Detector - $28.95
-
Total cost: $78.83
STEPS:
-
I would say that this was the hardest part of my entire build. And it's probably gonna be hard to explain the process (mostly because it's hard to explain how the actual metal walls are structured so if you don't understand what they look like, you might be confused why I built the walls certain ways) but I'll do my best to explain. I didn't put the wall paneling behind where the kitchen was, or where the bed was. So there were kind of 6 different sections of the walls:
-
The first section was behind the fridge which is to the right of the kitchen. So I measured how much I would need and cut out a little square that extended a few inches behind the kitchen so you couldn't see the insulation. I sanded and painted each piece (white) before I screwed/nailed them in. There was a metal bar that was in the middle of where I would be putting the wall piece so I had to nail down a short piece of 2 x 2 to the subfloor right up against the wall for stability. I then put one screw into the 2 x 2 (could've just nailed it in) and put one screw into the metal beam. Then at the top there was a gap so I covered that with a skinny piece of the paneling, which fit snugly between the window rim and the foam insulation and then I siliconed the front to the other panel. I used paintable white caulk for all the walls and weighed the top piece down while it dried.
-
The second section was the beam that ran from ceiling to floor in between the windows on the same side of the van. I had to cut out 3 pieces, one for the front, and 2 to go on the sides of the beam. The front facing piece was very straightforward but since the van is curved, I couldn't just measured the lengths for the sides of the beam and cut a straight line, I had to use rosin paper to make templates. This is how I did the majority of the walls. I just cut a piece that was maybe 6 inches long but wider than the beam, traced the edges and made small adjustments until I got it to the right shape, taped it down, repeated with another small section (it's way easier than trying to cut a piece the entire length and get the exact curvature the entire way), then taped that to the previous piece and so on. Then I traced that onto the paneling and cut it out with a jigsaw. I cut the paneling out for the front facing piece prior to doing the side pieces (and made the front piece a little wider on each side) so the ends of the sides would be covered by the front. So then I screwed in the side pieces first, pre drilling to make it easier (or possible I should day). I tried to only put screws where necessary cuz they look kinda bad so I did 3-4 per side. I used 1 inch screws all the times I used screws for the walls. I used wood putty for the few times I messed up, painted over that and the screws, then caulked the edges, using my finger and a towel to smooth it out.
-
The next section was straight across the van to the area to the right of the side doors. This area needed 4 pieces because of the way it's shaped. Basically I had to make two 2 sided boxes connected like a staircase. The process was the exact same as the previous section. The first piece to go in was secured between the insulation and window, I used clear caulk on the side that would touch the metal wall. I screwed the next piece onto the metal that was behind the left edge of the piece, then caulked the corner it made with the first piece. The third piece continued the staircase pattern and I screwed that into the metal as well and caulked the corner as well as behind the bottom part that I couldn't get a drill into because of the bed frame. I cut out a piece for the final part but did not put it in until much later because that was where the light switch would be and I hadn't done the electrical yet.
-
Next I went to the back of the van where there, again, is a very confusing layout. Since most peoples vans aren't like mine and I think the video I made of the build shows much better than I could explain, I'm gonna try to keep this brief and not try to explain the shape of the van. I needed the first part of back area to stick out a bit from the wall so 1. I wasn't drilling through the actual wall of van, and 2 because of a beam in the area. So I nailed in a small piece of 2 x 2 at the bottom like in step 2 and screwed in a piece of 2 x 2 that was cut in half lengthwise and widthwise with a table saw. I made the piece and nailed it to both with 5/8 inch nails. I covered the open area that resulted from the gap the same way I did in step 2. The next piece was harder to make a template for because there were cords and weird angles so I actually used a ton of pieces of tape to make a template which I traced the edges, took the tape off, cut out the shape, and drew onto the paneling. I used the table saw to make a small piece of 2 x 2 skinner (I cut about 3/4 off lengthwise) and screwed 2 of this into the metal toward the top of where the next piece would go. The piece was going to have to be diagonal though so I had to use a chop saw to cut diagonally, the pieces basically looked like ramps. Then I nailed the piece into those 4 things. The last piece would have to be screwed in (because long, unnecessary story) so I used 4 screws there. I did that one both sides, the only difference was that on the left side I had all my wires coming down from the ceiling so I duct taped those along the corner and cut a little hole in the bottom of one of the pieces for them to come out. I also used the rosin paper and traced over the pieces from the first side I did, cut out the paper and flipped it over before tracing onto the paneling to make it easier and faster to do the second side.
-
The 5th section was these little boxes I had to make that went along the top of the van all the way around (except the back which is the next step). I started by cutting a 1 x 3 lengthwise at a 30 degree angle on the table saw and then used the chop saw to cut it widthwise into a few pieces. I then placed a piece underneath the area that is made for wires to go through so the angle I cut was in line with the angle of that wire area. I predrilled and then screwed in 1 inch screws (you can do this because 1 x 3's aren't actually 1 x 3, nor are any lumber strips the actual dimensions they're named...). I put 12 of these on total, 2 in each 'section' (not to be confused with the 6 sections I've been going through) if you think of the area being divided by the beams in steps 3 and 4. But on the 'section' right above the side doors, I had to cut the 1 x 3 a bit skinnier because of how high the door comes up and put 4 here. I started nailing in the underside pieces first, then the pieces above. I used little pieces of painted tape to mark where the 1 x 3's were when putting the top pieces on so I'd know where I could nail them in. I also divided the pieces of panelling by each of the 4 sections, so they met above the beams in step 3 and 4, and I just caulked all the places the panels met.
-
The final section was the top back, which is set up kind of similar to the previous section. For the forward facing part, I cut a 2 x 2 to the width of these cords that went all the way across and put 4 pieces along that side, then for the bottom I put pieces with a smilier width to the pieces above the side doors (also put 4 all the way across). Then I nailed in the 2 pieces.
-
There were a few places in my van (the 2 back corners and the corner of the section to the right of the side doors) that there was no way to curve the paneling enough o go around it so I had to use bondo to cover those areas. I started by putting cutting out and putting little pieces of cardboard in the back corner where there was a wide gap (so the bondo wouldn't be able to adhere to anything), which I caulked to the metal + panelling. I watched some tutorials on how to use bondo and read the directions but it still took a little practice to get use to using it. I would recommend if you need to use this in your van, practice on some scrap pieces first. Basically bondo is this toxic, noxious smelling, fast drying substance that you're not suppose to get on your skin and it's not at all easy to work with or get to look good. I found that that since I was working with a curved surface, a flexible kitchen spatula worked best. I would scoop out about a goofball sized amount of bondo and about an inch line of the cream hardener that comes with it, and mixed those two up in the cover/bowl that comes with it. Then I scooped up the small amount of bondo (you have to keep it small because it dries in 3-4 mins once you put the hardener in it) and spread it over the areas that needed to be covered. Then if too much got somewhere I didn't want it, I just used a paper towel to wipe it off or toward the area that needed it. I also used my fingers to spread it out, which you're not suppose to do because it can cause skin irritation, but I found that it made it way easier to make it smooth. Then I would quickly put painters tape over every place I had just put the bondo, the also helps to smooth it out a lot. I usually waited at about 10 mins to take the tape off and when I did I would add a little more to the places that needed it, repeat the same process, and then also use 80 grit sandpaper (the lower the grit, the rougher the sandpaper, 80 is pretty rough) to smooth it out as I go to see what areas needed to be done again. The leftover bondo in the mixing bowl can just be scraped out with a flathead screwdriver, which can also be used to scrape of excess on the walls. Due to my inexperience with bondo, I had to do this process many many times for each area which took many hours so it's a pretty long process. Once it was as good as I had patience for, I used 400 grit sand paper to make it super smooth. Lastly, I painted over it a few times until it matched the color of the walls. I later had to go back and put some white caulk along the edges of where the bond was because once i drove it the first time, the movement of the walls made it kind of crack off a little.
-
Then I taped up everything along the walls with painters tape and did one final coat of paint on the entire thing except at this point I still hadn't done the electrical so there was one piece that didn't go in at that time. But once the electrical was done, I just cut a hole the size of the switch into the piece, sanded it, took out the wires that went to the switch, put the switch into the hole, and then put the wires back where they went, screwed the piece in, caulked, repainted, and did another small area of bondo.
NOTES:
-If you don't have windows in your van, this step will be much easier and you'll be able to basically just do rectangular sheets for most of the walls but you'll have to check out other van builds to see how to do that!
FLOORING & BED STORAGE
VIDEO
SUPPLIES I USED:
-
Innova Luxe Andorra Oak Vinyl Planks (20 sq ft/ 16 planks per pkg) - $58.89
-
2" x 2" x 8' lumber strip - $1.84
-
Liberty 3/8" Inset Hinges (2 pk) x 2 @ 2.98 - $5.94
-
Nail gun + 5/8" nails
-
Rubber Mallet
-
Milled tooth file
-
Jigsaw
-
Safety glasses
-
Pencil
-
Belt sander
-
Chop saw
-
Table saw
-
2 sawhorses
-
Everbilt 1.5 inch 4 pack corner braces - $1.97
-
Red rosin paper + scissors
-
Total cost: $68.64
STEPS:
-
Before starting the flooring, I screwed down 4 corner brackets on the inside of the kitchen so it wouldn't move as I was putting the flooring in. Afterward I had to unscrew them so I could put doors under the bed. I was going to be putting a 2 x 2 across the bottom of where the doors would be so it would cover up the ends of all the floor planks on that side. The side that met the carpet at the front of the van would just be left looking kinda bad so I just tried to make it line up with the plywood subfloor as best as possible.
-
I started with one plank along the kitchen starting at the back of the van. My planks went about 3/4 of the length of the van so once I had the full length plank where I wanted it to be (I'd drawn a line in pencil on the subfloor where the end of the 2 x 2 would be), I put another plank where it would be and marked with pencil where I would need to cut it, then did so with a chop saw. I put the tongue into the groove then and nailed down the planks (with one nail on the end of each plank). Then I started with the leftover part of the plank I'd cut toward the back of the van. I found it was much easier to put the tongue and groove in of the short ends of planks together and then put them into the planks previously nailed in so that's how I did the rest of the van.. starting with the leftover piece from the end of the previous row, connecting that to a full plank, nailing those in, and then when needed, adding a 3rd plank and tapping it in with a rubber mallet from the short end pointing toward the from of the van.
-
Once I got to the other side of the van, I used a jigsaw to cut out smaller, more curved pieces to fit with the curve along the step of the van and into the corner by the bed frame. I used the rosin paper to make templates where needed then traced them onto the planks. Then on the left side of the kitchen there was a small area that needed 2 short planks, in which I just used a chop saw to cut to the right length and used one nail per plank for.
-
After that, the only part left was to the right of the kitchen where the fridge would be. The problem was that I only had 1.5 planks left and probably would've needed 3 or 4, which was not enough to go and spend $60 on another package, so I only put planks where the plywood subfloor would've been visible with the fridge in it's place. And that's it. I think it's the only part of the van build where I didn't get frustrated or confused!
-
For the bed storage doors, I nailed a 2 x 2 over the edges of the flooring (also put one on the other end of the bed to keep the storage containers from sliding out). I stained the 2 x 2 and the doors before putting them on. I used the same hinges as for the kitchen doors and put them on the same way. I made 2 doors out of plywood, the one on the left went from one side to the middle bed leg, and the other one is smaller because I had to cut it off where the kitchen starts so it can open. I just nailed the plywood piece that would be behind the side of the kitchen to the wheel box and bed frame. Once problem I had was that there was a small gap between the 2 x 2 and the bottom of the doors so i put another 2 x 2 onto of it, nailing it in again. The doors stayed closed just fine so I didn't need to put a roller catch on them.
-
Then lastly I just put screws into the left side of the wheel box in front where the carbon monoxide detector would go, and put the detector on the screws.
NOTES:
-This is one of the last steps for me because I wasn't going to be putting flooring in the entire van since it's spendy so I just wanted it to be in the main part, but if you're gonna make it looker nicer and do it everywhere, you'd of course want this to be done much earlier.
-Something that might be smart to do (which thinking about it now I should've done but am also glad I didn't) is use a table saw to cut the groove off the plank that butted up to the kitchen. In most cases that would make it look just a bit nicer but since my planks went perfectly to the end of the where the step into the van was, cutting off anymore would've meant that it would've been a few mils too short which would've looked worse.
ELECTRICAL
VIDEO
SUPPLIES I USED:
-
3 100 Watt Renogy Monocrystalline Solar Panels + 30 Amp PWM Charge Controller
-
Renogy 500 Watt Pure Sine Wave Inverter - $169.99
-
AGM Deep Cycle 125 ah Battery - $279.99
-
Wires that come with inverter and panels
-
Napa Light Duty Fuse Holder - $3.72
-
Ring crimp terminal connectors
-
8 Terminal ground block
-
7.5 amp Fuse
-
3 Spade Terminals
-
Wrench
-
Screwdriver + drill + drill bits
-
Wire crimpers + cutters
-
2" x 4" x 8' lumber strip
-
Nails + nail gun
-
Someone who knew how to do this stuff - $20.00
-
Total Cost: $473.70
STEPS:
-
I had someone who was a mechanic and knew a bit about electrical/solar stuff do this part for me. I just watched and took notes. The only thing I did was put the battery into the corner of the van behind the bed and since it was secure on three sides, I just nailed in a piece of 2 x 4 in front of it so it wouldn't move anywhere.
-
The first thing he did was screwed the charge controller into the wall about 6 inch above the battery, and the inverter onto the floor, not too close to anything so it could ventilate properly, about 4 inch in front of the battery, both using the screws they came with.
-
Then he cut the wires (that came with the panels) that went from the charge controller (cc) to the battery to the right length, leaving a little extra wire on, then cut about a half inch of the plastic off the wires and twisted the ends. He unscrewed the + and - terminals of the cc, put the wires up in there, and screwed the screws back down. The inverter comes with 2 short wires with rings on both ends. He unscrewed the caps on the inverter, placed the rings on, then screwed the caps back down. None of the 4 wires were connecter to the battery terminals yet.
-
Next he screwed in a ground block on the wheel box a few inches above the battery. He unscrewed one terminal from the block and both terminal nuts from the battery and put a wire with a ring on the end onto the block terminal, then screwed the screw back down. Later the other end of the wire will be connected to the negative terminal of the battery. You may need to get just plain wire and ring terminal connectors and then crimp the rings onto the ends of the wires. You will also need to make sure that the ring connectors are the right size for the terminals, as the battery and ground terminals will likely be different sizes.
-
Next he put small ring connectors on the ends of the - from the fan, ground from the light switch, and - from the light switch, then put the rings all on the same terminal of the ground block and screwed them down.
-
The + from the lights went to the battery, the - from the lights went to the switch and 2 wires came from the switch to the back: - and ground. He put spade terminals on the ends of the 3 wires where they went into the switch. The + wires for the lights and fan needed a ring connector on their ends. The fan comes with a built in fuse but the lights needed on so he cut the + light wire, removed plastic from ends, twisted, put into fuse holder, put a 7.5 amp fuse into the holder, and crimped the holder to the wires. I would recommend putting fuses between all components (cc to panels, cc to battery, battery to inverter).
-
Then he took the + wire from the fan, + wire from the lights, + wire from the cc, and + wire from the inverter and put them onto the + battery terminal and the wire coming from the ground block, the - wire from the cc, and the - wire from the inverter and placed them (all with rings on the ends) onto the - battery terminal and screwed the nuts down, tightened them with a wrench.
-
The last thing you do is connect the cc to the panels. First I put the cardboards boxes the panels came in on top of the panels so they were not producing any energy, then unscrewed the solar panel terminals on the cc and put the wires in the same way as with the battery, screwing the screws back down.
-
Then we changed the battery indicator light on the cc to the type of battery I have. There were 3 options, sealed, GEL, and flooded, mine was GEL so we pressed the button on the cc until the light turned to the right color for a GEL battery.
-
To recap the wires: fan + wire went to battery + terminal, light + wire went to battery + terminal, fan - wire went to ground black, light - wire went to light switch, - and ground wires went from light switch to ground block, wire went from ground block to - battery terminal, so did - wire from cc and - wire from inverter, and + wire from cc, + wire from inverter, + wire from lights, and + wire from fan went to + battery terminal. Lastly, + and - wires from panels went into + and - cc terminals.
NOTES:
- I would recommend having someone who is experienced in this area do this for you or at least help/give you guidance. Working with this stuff can be dangerous if you don't take the necessary precautions or don't know what you should and shouldn't do.
- Always read instruction manuals front to back and make sure you are aware of the safety warnings.
- A quick explanation of each component I used: Solar panels absorbs rays and produce electricity. The charge controller regulates the electric current from the panels and prevents overcharging of the battery as well as protects against over voltage. The battery is what collects and stores the energy from the panels so when its night for example, you can still power your items using the energy stored in the battery. An inverter is what converts DC (direct current) to AC (alternating current). What this means is that in order to charge or use something that would plug into a household outlet like a fridge, computer, etc- you need an invert to convert the power. Things like lights that don't plug in and a roof fan/vent, do not need to go through an inverter because they are DC.
- Try to do as much research as you can to determine what products you'll need and how much wattage, voltage, amps, amp hours, etc they will need. You can find solar need calculators online but honestly they're hard to use and I found it's best to just see what over people have and what they're able to run from it.
- Make sure the light switch you get is the right voltage- which I'm guessing for most will be 12 volt. You also will probably have to get something called a toggle switch (versus a regular household switch) which can be found at car part stores.
DOOR PANELS
VIDEO
SUPPLIES I USED:
-
1/4" x 4' x 8' sanded utility plywood - $11.66
-
Red rosin paper
-
Tape Measure
-
Packing Tape
-
Scissors
-
Sharpie/pencil
-
2 sawhorses
-
T-square ruler
-
Circular saw
-
Milled tooth file
-
Belt sander
-
Jigsaw
-
Towel
-
Painters tape
-
Drill + drill bits
-
Metal screws
-
Screwdriver
-
Polyurethane
-
Paint Brush + foam paint brush
-
Dap Silicone Sealant
-
Caulk gun
-
Total cost - $11.66
STEPS:
-
My first step was measuring out the basic dimensions of my doors. Unfortunately my doors were not perfect squares or even rectangles or even just had curves along the sides, the paneling I was going to be putting on the doors would actually have to be warped because the door itself curved. That made the process a lot harder but luckily it is possible to curve certain types of wood. After a while I found that the best way to go about this was to measure out the longest and widest part of where the board would cover, cut that out of the red rosin paper, tape it onto the area, and outline in sharpie approximately where the edge will be.
-
Next I cut out the template and laid it on the paneling and used a T-square ruler to make the outlines straighter (only of course where there were straight lines). Then with a circular saw, I cut along those lines, sanded the sides with a milled tooth file, and put the piece up where it would go to see what adjustments needed to be made. For each of the 4 door panels I had to make, there were always a ton of little things here in there and I used a belt sander to take off what needed to be smaller and then also used it to curve the edges all the way around, as well as the corners.
-
For my outlet (that would allow me to plug in at campgrounds- except it doesn’t actually work hah) on my back door, I had to cut out an area within my panel. If you're able to you can just drill a hole in the area with a drill bit thats larger than your saw blade and cut it out with a jigsaw that way but, for example, my outlet would not fit through the size of the hole I needed because we couldn't unattached it from the cord that held it in there and the hole hard to be smaller than the widest/longest part of the outlet so that the screws in the outlet would be able to go into the wood, so we just cut a little slit in the top down to the hole, and slid the cord through that.
-
Once I had it to the best size I could get, I wet a towel with a hose and wrapped it around the board for 15-30 mins. I put a weight on it where it would need to curve but that is unnecessary, the board just needs to absorb water. You could also put it in a bathtub.
-
I put little pieces of tape around the outside of the door (right on the edge of where the panel would go) so that I knew where there was enough metal near the edges to screw into. I also took a picture on my phone to reference if needed.
-
Then I placed the door panel where it needed to go and held it there as highly as possible, with help from my mom. This is definitely not a step you can do on your own unless you have clamps that can hold it while you drill. We found out that the holes needed to be predrilled, so my step dad (after many attempts of me trying to do this) drilled one hole in the top middle while my mom and I held the board, and then I drilled a screw in there. Make sure the bit you use to pre-drill is smaller than the screw but not too small, it might take some trial and error. Once one screw is in, its a lot easier to make sure the board doesn't move so then we would drill a few holes in an area at a time, then put those screws in, then move onto another area. Its important if your doors are curved not to go all over the place because you have to take the curves into account. The curved part was always what we did last and I would just press it in as far as possible while we predrilled and then the screws suck it right in and keep it there. I did experience on all doors a tiny bit of "wrinkling"- Im not sure what its called but theres just a little line on each door from the water and bending, but as long as the door didn't break, I was fine with that. There was also a space that I could stick my hand in at the bottom of both back doors where the curve is but there wasn't much we could do about it because the paneling wouldn't bend anymore so we just left it. Afterwords, I went back in with a screwdriver and tightened every screw.
-
Next I stained each of them the dark brown color that I also used the ceiling and kitchen. I used just a regular foam brush but then once it was applied to an area, I used paper towel to spread it around, even it out, and make it a bit lighter. I put painters tape around the edges but found that its easier to get stain on the actual door and just wipe it off with the paper towel. I finished it off with some polyurethane (using a regular paint brush) and then went around every edge with silicone sealant and smoothed it out with my finger and a towel to make it look nice.
NOTES:
- If your doors aren't curved this whole process is way easier... you don't have to soak them and therefore I would recommend staining + polyurethaning them before screwing them in. You could also use tongue and groove paneling on them if you wanted to.
- When staining, do not let it dry and then stain more in a certain area of the same door, you will (likely) be able to see an outline. Also, be sure to smear with the towel as you go- don't let it dry too much before doing so.
WINDOW COVERS
VIDEO
SUPPLIES I USED:
-
36" Sew Essentials White muslin fabric from Joann Fabrics, 2.99/yd on sale 40% off so 1.79/yd, 6.5 yds - $11.64
-
45" Black Symphony polyester fabric from Joann Fabrics, 4.99/yd reg, used 50% coupon on their app so 2.49/yd, 6.5 yds - $16.19
-
Cardboard boxes that larger items I bought for the van (mattress, stove, sink, etc) had been sent it
-
Red rosin paper
-
Sharpie + pen
-
Scissors
-
Utility knife
-
Tape measure
-
Packing tape + regular tape
-
Sewing pins
-
Sewing machine + white thread
-
Total cost: $29.39
STEPS:
-
The first thing I did was measured the widest part of the window and cut the paper according to that, with a little extra room on each side. Then I used packing tape to secure it over the window so I could use both hands to draw the outline with sharpie. It's better to make the outline a bit bigger than it needs to be because you can always cut more off the cardboard. Then I just cut around the line I drew with scissors.
-
Next I cut one corner of a cardboard box so it lay flat and used a few pieces of regular tape to secure the template to the box. Then with a utility knife I cut around the outline. After the original cut, I put it in the window to see where I needed to make adjustments and had to make a ton of small ones which, like I said, is better than cutting too much. Once I did that for all 7 windows, I labeled each one (back door right, back door left, front side, side door small, etc) so i didn't get confused.
-
Next I jotted down measurements for the widest part of each window and added each together, as well as an extra 2 inches for each window and then rounded to the nearest half yard (from 6.3 to 6.5 yds) to be super sure I would get enough fabric (I would guess that almost all fabric is going to be long enough that you'll only need to measure the width of the windows).
-
Then I went to Joann Fabrics and found the cheapest black and white fabric there, the white one happened to be 40% off and I found out if you download their app you get get 50% regular priced fabric so I used that on the black and my total came to a little less than $30.
-
When I got home I laid the white fabric on top of the black and then the cardboard cutouts on top, leaving about 2 inches between each piece. What I didn't do and had to go back and fix was that you want the side of the cardboard that will be facing the outside of the van to be facing upward!! Do not forget that! When you sew the fabric together, you will have to flip it inside out and then it will be opposite of what you want.
-
So then I traced with pen around the outside of the cardboard, removed the cardboard, and placed sewing pins along the inside of the outline so that the fabrics didn't get messed up. I did one in each corner and then 2-3 along the sides for my smaller windows, 4-5 for my bigger ones.
-
I cut about 1 inch away from the outline because, since I was going to be using a sewing machine (if you don't have one, see if you know anyone who does and will let you borrow it, thats what I did), I wanted to have a bit of extra fabric on each side.
-
My mom use to do a lot of sewing so luckily she showed me how to use it but if you're not sure how, just watch a video online because they're actually kind of complicated. I sewed right in the middle of the outline and where I cut, so about a half inch from the outline. I left the bottom open so I would be able to get the the fabric on the cardboard. So the line I sewed looked like an upside down U. (When you start and end, you want to make sure to go forward with the sewing machine an inch or so, then reverse it the same distance, and then forward the same distance again to secure it... or you can just make a few knots.)
-
After I was done I flipped it inside out and tested it out before I sewed any others. I just left the bottom hanging down but you can glue or even staple the fabric up in there to make it look a little neater.
-
Later on, I also made one for the fan, this time I used black fabric for both sides because that was all I had and just stapled it to both sides of my cardboard square, then cut out a little diet on one side so I could get my finger in it so I would be able to take it out easier.
NOTES:
- The most common way I see people make window covers is with reflectix instead of the cardboard I used but the reason I decided not to do that is because I wasn't sure how effective it would be. You would need an air gap between the window cover and the windows in order for the reflectix to do it's job but I was never quite clear on how much is recommended and didn't feel like there would hardly be any, so I decided to not spend the extra money since I wasn't sure how well it would work. Another thing to keep in mind is that black fabric is not good to have facing outside during the day when it's hot out because it absorbs heat, while white reflects it and is therefore better. My windows are not symmetrical though so there's no way I could flip them over for day and night. But if you can find a good way to do that, then reflectix might be a better option for you!
- You also want to consider where you will store your window covers when not in use during the van build. You can always fold them in half or roll them if you're doing reflectix, but just make sure you have a place for them.
TOTAL COST
VAN: $5,000.00
CONVERSION: $2,953.14
(Everything listed above and other things that I consider part of the conversion like knobs, storage containers and a few other things):
OTHER: $1,812.07
(Things that weren't part of the conversion but were related to the van like kitchenware, everyday supplies, and things like a national parks pass, insurance for 6 months, repairs, taxes, title, license registration, etc)